General
This section will show you how to configure the COMPSs framework in detail.
Configure SSH passwordless
By default, COMPSs uses SSH libraries for communication between nodes. Consequently, after COMPSs is installed on a set of machines, the SSH keys must be configured on those machines so that COMPSs can establish passwordless connections between them. This requires to install the OpenSSH package (if not present already) and follow these steps on each machine:
Generate an SSH key pair. When asked for password field leave it empty.
$ ssh-keygen -t rsa
Distribute the public key to all the other machines and configure it as authorized
$ # For every other available machine (MACHINE):
$ scp ~/.ssh/id_rsa.pub MACHINE:./myRSA.pub
$ ssh MACHINE "cat ./myRSA.pub >> ~/.ssh/authorized_keys; rm ./myRSA.pub"
Check that passwordless SSH connections are working fine
$ # For every other available machine (MACHINE):
$ ssh MACHINE
For example, considering the cluster shown in Figure 5, users will have to execute the following commands to grant free ssh access between any pair of machines:
me@localhost:~$ ssh-keygen -t rsa
# Granting access localhost -> m1.bsc.es
me@localhost:~$ scp ~/.ssh/id_rsa.pub user_m1@m1.bsc.es:./me_localhost.pub
me@localhost:~$ ssh user_m1@m1.bsc.es "cat ./me_localhost.pub >> ~/.ssh/authorized_keys; rm ./me_localhost.pub"
# Granting access localhost -> m2.bsc.es
me@localhost:~$ scp ~/.ssh/id_rsa.pub user_m2@m2.bsc.es:./me_localhost.pub
me@localhost:~$ ssh user_m2@m2.bsc.es "cat ./me_localhost.pub >> ~/.ssh/authorized_keys; rm ./me_localhost.pub"

me@localhost:~$ ssh user_m1@m1.bsc.es
user_m1@m1.bsc.es:~> ssh-keygen -t rsa
user_m1@m1.bsc.es:~> exit
# Granting access m1.bsc.es -> localhost
me@localhost:~$ scp user_m1@m1.bsc.es:~/.ssh/id_rsa.pub ~/userm1_m1.pub
me@localhost:~$ cat ~/userm1_m1.pub >> ~/.ssh/authorized_keys
# Granting access m1.bsc.es -> m2.bsc.es
me@localhost:~$ scp ~/userm1_m1.pub user_m2@m2.bsc.es:~/userm1_m1.pub
me@localhost:~$ ssh user_m2@m2.bsc.es "cat ./userm1_m1.pub >> ~/.ssh/authorized_keys; rm ./userm1_m1.pub"
me@localhost:~$ rm ~/userm1_m1.pub

me@localhost:~$ ssh user_m2@m2.bsc.es
user_m2@m2.bsc.es:~> ssh-keygen -t rsa
user_m2@m2.bsc.es:~> exit
# Granting access m2.bsc.es -> localhost
me@localhost:~$ scp user_m2@m1.bsc.es:~/.ssh/id_rsa.pub ~/userm2_m2.pub
me@localhost:~$ cat ~/userm2_m2.pub >> ~/.ssh/authorized_keys
# Granting access m2.bsc.es -> m1.bsc.es
me@localhost:~$ scp ~/userm2_m2.pub user_m1@m1.bsc.es:~/userm2_m2.pub
me@localhost:~$ ssh user_m1@m1.bsc.es "cat ./userm2_m2.pub >> ~/.ssh/authorized_keys; rm ./userm2_m2.pub"
me@localhost:~$ rm ~/userm2_m2.pub
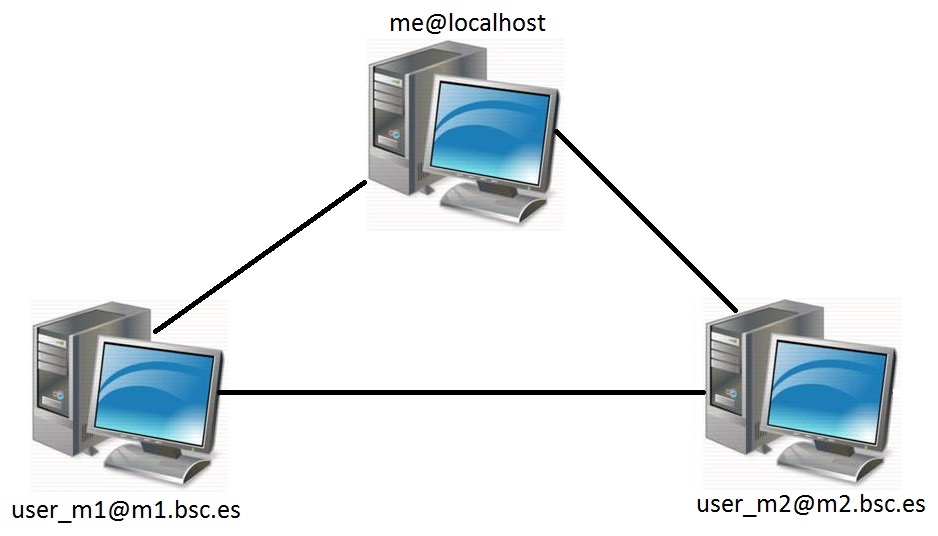
Figure 5 Cluster example
Configuration Files
The COMPSs runtime has two configuration files: resources.xml and
project.xml . These files contain information about the execution
environment and are completely independent from the application.
For each execution users can load the default configuration files or
specify their custom configurations by using, respectively, the
--resources=<absolute_path_to_resources.xml> and the
--project=<absolute_path_to_project.xml> in the runcompss
command. The default files are located in the
/opt/COMPSs/Runtime/configuration/xml/ path.
Next sections describe in detail the resources.xml and the
project.xml files, explaining the available options.
Resources file
The resources file provides information about all the available
resources that can be used for an execution. This file should normally
be managed by the system administrators. Its full definition schema
can be found at /opt/COMPSs/Runtime/configuration/xml/resources/resource_schema.xsd.
For the sake of clarity, users can also check the SVG schema located at
/opt/COMPSs/Runtime/configuration/xml/resources/resource_schema.svg.
This file contains one entry per available resource defining its name and its capabilities. Administrators can define several resource capabilities (see example in the next listing) but we would like to underline the importance of ComputingUnits. This capability represents the number of available cores in the described resource and it is used to schedule the correct number of tasks. Thus, it becomes essential to define it accordingly to the number of cores in the physical resource.
compss@bsc:~$ cat /opt/COMPSs/Runtime/configuration/xml/resources/default_resources.xml
<?xml version="1.0" encoding="UTF-8" standalone="yes"?>
<ResourcesList>
    <ComputeNode Name="localhost">
        <Processor Name="P1">
            <ComputingUnits>4</ComputingUnits>
            <Architecture>amd64</Architecture>
            <Speed>3.0</Speed>
        </Processor>
        <Processor Name="P2">
            <ComputingUnits>2</ComputingUnits>
        </Processor>
        <Adaptors>
            <Adaptor Name="es.bsc.compss.nio.master.NIOAdaptor">
                <SubmissionSystem>
                    <Interactive/>
                </SubmissionSystem>
                <Ports>
                    <MinPort>43001</MinPort>
                    <MaxPort>43002</MaxPort>
                </Ports>
            </Adaptor>
        </Adaptors>
        <Memory>
            <Size>16</Size>
        </Memory>
        <Storage>
            <Size>200.0</Size>
        </Storage>
        <OperatingSystem>
            <Type>Linux</Type>
            <Distribution>OpenSUSE</Distribution>
        </OperatingSystem>
        <Software>
            <Application>Java</Application>
            <Application>Python</Application>
        </Software>
    </ComputeNode>
</ResourcesList>
Project file
The project file provides information about the resources used in a
specific execution. Consequently, the resources that appear in this file
are a subset of the resources described in the resources.xml file.
This file, that contains one entry per worker, is usually edited by the
users and changes from execution to execution. Its full definition
schema can be found at
/opt/COMPSs/Runtime/configuration/xml/projects/project_schema.xsd.
For the sake of clarity, users can also check the SVG schema located at
/opt/COMPSs/Runtime/configuration/xml/projects/project_schema.xsd.
We emphasize the importance of correctly defining the following entries:
- installDir
Indicates the path of the COMPSs installation inside the resource (not necessarily the same than in the local machine).
- User
Indicates the username used to connect via ssh to the resource. This user must have passwordless access to the resource (see Configure SSH passwordless Section). If left empty COMPSs will automatically try to access the resource with the same username as the one that lauches the COMPSs main application.
- LimitOfTasks
The maximum number of tasks that can be simultaneously scheduled to a resource. Considering that a task can use more than one core of a node, this value must be lower or equal to the number of available cores in the resource.
compss@bsc:~$ cat /opt/COMPSs/Runtime/configuration/xml/projects/default_project.xml
<?xml version="1.0" encoding="UTF-8" standalone="yes"?>
<Project>
    <!-- Description for Master Node -->
    <MasterNode></MasterNode>

    <!--Description for a physical node-->
    <ComputeNode Name="localhost">
        <InstallDir>/opt/COMPSs/</InstallDir>
        <WorkingDir>/tmp/Worker/</WorkingDir>
        <Application>
            <AppDir>/home/user/apps/</AppDir>
            <LibraryPath>/usr/lib/</LibraryPath>
            <Classpath>/home/user/apps/jar/example.jar</Classpath>
            <Pythonpath>/home/user/apps/</Pythonpath>
        </Application>
        <LimitOfTasks>4</LimitOfTasks>
        <Adaptors>
            <Adaptor Name="es.bsc.compss.nio.master.NIOAdaptor">
                <SubmissionSystem>
                    <Interactive/>
                </SubmissionSystem>
                <Ports>
                    <MinPort>43001</MinPort>
                    <MaxPort>43002</MaxPort>
                </Ports>
                <User>user</User>
            </Adaptor>
        </Adaptors>
    </ComputeNode>
</Project>
Configuration examples
In the next subsections we provide specific information about the
services, shared disks, cluster and cloud configurations and several
project.xml and resources.xml examples.
Parallel execution on one single process configuration
The most basic execution that COMPSs supports is using no remote workers
and running all the tasks internally within the same process that hosts
the application execution. To enable the parallel execution of the
application, the user needs to set up the runtime and provide a
description of the resources available on the node. For that purpose,
the user describes within the <MasterNode> tag of the
project.xml file the resources in the same way it describes other
nodes’ resources on the using the resources.xml file. Since there is
no inter-process communication, adaptors description is not allowed. In
the following example, the master will manage the execution of tasks on
the MainProcessor CPU of the local node - a quad-core amd64 processor at
3.0GHz - and use up to 16 GB of RAM memory and 200 GB of storage.
<?xml version="1.0" encoding="UTF-8" standalone="yes"?>
<Project>
    <MasterNode>
        <Processor Name="MainProcessor">
            <ComputingUnits>4</ComputingUnits>
            <Architecture>amd64</Architecture>
            <Speed>3.0</Speed>
        </Processor>
        <Memory>
            <Size>16</Size>
        </Memory>
        <Storage>
            <Size>200.0</Size>
        </Storage>
    </MasterNode>
</Project>
If no other nodes are available, the list of resources on the
resources.xml file is empty as shown in the following file sample.
Otherwise, the user can define other nodes besides the master node as
described in the following section, and the runtime system will
orchestrate the task execution on both the local process and on the
configured remote nodes.
<?xml version="1.0" encoding="UTF-8" standalone="yes"?>
<ResourcesList>
</ResourcesList>
Cluster and grid configuration (static resources)
In order to use external resources to execute the applications, the following steps have to be followed:
Install the COMPSs Worker package (or the full COMPSs Framework package) on all the new resources.
Set SSH passwordless access to the rest of the remote resources.
Create the WorkingDir directory in the resource (remember this path because it is needed for the
project.xmlconfiguration).Manually deploy the application on each node.
The resources.xml and the project.xml files must be configured
accordingly. Here we provide examples about configuration files for Grid
and Cluster environments.
<?xml version="1.0" encoding="UTF-8" standalone="yes"?>
<ResourcesList>
    <ComputeNode Name="hostname1.domain.es">
        <Processor Name="MainProcessor">
            <ComputingUnits>4</ComputingUnits>
        </Processor>
        <Adaptors>
            <Adaptor Name="es.bsc.compss.nio.master.NIOAdaptor">
                <SubmissionSystem>
                    <Interactive/>
                </SubmissionSystem>
                <Ports>
                    <MinPort>43001</MinPort>
                    <MaxPort>43002</MaxPort>
                </Ports>
            </Adaptor>
            <Adaptor Name="es.bsc.compss.gat.master.GATAdaptor">
                <SubmissionSystem>
                    <Batch>
                        <Queue>sequential</Queue>
                    </Batch>
                    <Interactive/>
                </SubmissionSystem>
                <BrokerAdaptor>sshtrilead</BrokerAdaptor>
            </Adaptor>
        </Adaptors>
    </ComputeNode>

    <ComputeNode Name="hostname2.domain.es">
      ...
    </ComputeNode>
</ResourcesList>
<?xml version="1.0" encoding="UTF-8" standalone="yes"?>
<Project>
    <MasterNode/>
    <ComputeNode Name="hostname1.domain.es">
        <InstallDir>/opt/COMPSs/</InstallDir>
        <WorkingDir>/tmp/COMPSsWorker1/</WorkingDir>
        <User>user</User>
        <LimitOfTasks>2</LimitOfTasks>
    </ComputeNode>
    <ComputeNode Name="hostname2.domain.es">
      ...
    </ComputeNode>
</Project>
Services
This section will show you how to configure the COMPSs framework to use web services.
Configuration
To allow COMPSs applications to use WebServices as tasks, the
resources.xml can include a special type of resource called
Service. For each WebService it is necessary to specify its wsdl, its
name, its namespace and its port.
<?xml version="1.0" encoding="UTF-8" standalone="yes"?>
<ResourcesList>
    <ComputeNode Name="localhost">
      ...
    </ComputeNode>

    <Service wsdl="http://bscgrid05.bsc.es:20390/hmmerobj/hmmerobj?wsdl">
        <Name>HmmerObjects</Name>
        <Namespace>http://hmmerobj.worker</Namespace>
        <Port>HmmerObjectsPort</Port>
    </Service>
</ResourcesList>
When configuring the project.xml file it is necessary to include the
service as a worker by adding an special entry indicating only the name
and the limit of tasks as shown in the following example:
<?xml version="1.0" encoding="UTF-8" standalone="yes"?>
<Project>
    <MasterNode/>
    <ComputeNode Name="localhost">
      ...
    </ComputeNode>

    <Service wsdl="http://bscgrid05.bsc.es:20390/hmmerobj/hmmerobj?wsdl">
        <LimitOfTasks>2</LimitOfTasks>
    </Service>
</Project>
HTTP configuration
To enable execution of HTTP tasks, Http resources must be included in the
resources file as shown in the following example. Please note that the BaseUrl
attribute is the unique identifier of each Http resource. However, it’s possible to
assign a single resource to multiple services and in the same way one service
can be executed on various resources.
<?xml version="1.0" encoding="UTF-8" standalone="yes"?>
<ResourcesList>
    <ComputeNode Name="localhost">
      ...
    </ComputeNode>

    <Http BaseUrl="http://remotehost:1992/test/">
        <ServiceName>service_1</ServiceName>
        <ServiceName>service_2</ServiceName>
    </Http>

    <Http BaseUrl="http://remotehost:2020/print/">
        <ServiceName>service_2</ServiceName>
        <ServiceName>service_3</ServiceName>
    </Http>

</ResourcesList>
Configuration of the project file must have the Http worker(s) as well, in order
to let the runtime know limit of tasks to be executed in parallel on resources.
<?xml version="1.0" encoding="UTF-8" standalone="yes"?>
<Project>
    <MasterNode/>
    <ComputeNode Name="localhost">
      ...
    </ComputeNode>

    <Http BaseUrl="http://remotehost:1992/test/">
        <LimitOfTasks>1</LimitOfTasks>
    </Http>

    <Http BaseUrl="http://remotehost:2020/print/">
        <LimitOfTasks>1</LimitOfTasks>
    </Http>

</Project>